Task
Task List
No tasks yet. Add your first task above!
Organize your study tasks with an interactive Gantt chart timeline
No tasks yet. Add your first task above!
Welcome to a smarter way to organize your academic life. The Study Planner from Toolota isn’t just another digital notepad; it’s an interactive scheduling engine that builds a professional-grade Gantt chart from your simple inputs. A Gantt chart is a horizontal bar chart used in project management to illustrate a project schedule, and it’s perfectly suited for mapping out a study plan.
This free, web-based tool eliminates the complexity of traditional project software. You don’t need to learn intricate features. Instead, you get a clean, intuitive interface where you define your study tasks, and the tool automatically generates a dynamic, color-coded timeline. The Study Planner with Toolota gives you instant clarity on your commitments, helping you allocate time wisely, balance priorities, and avoid last-minute cramming. It’s about working smarter, not harder, by making your time visible.
Let’s be honest: a simple to-do list often isn’t enough when you’re facing a mountain of study material. Writing “Study Biology” on a sticky note doesn’t tell you when to do it, for how long, or how it fits alongside your other subjects. This is where traditional planning fails and a visual Study Planner steps in as a critical upgrade.
Cognitive science tells us that our brains process visual information 60,000 times faster than text. When you can see your schedule—your tasks laid out across a timeline—you instantly understand the scope of your workload, identify potential conflicts, and build a realistic plan. It transforms an overwhelming list into a manageable map. Moving from guesswork to a structured, visual plan is the difference between feeling chaotic and feeling in control. This is the core problem the Study Planner by Toolota is designed to solve.
Using this tool is straightforward. Follow these steps to build your first visual study schedule. (All instructions are based on the actual UI and functionality of the provided HTML tool).
Step 1: Access the Tool
Navigate to the Study Planner in Toolota on your device. The tool loads instantly in your browser—no downloads or sign-ups required.
Step 2: Define Your First Study Task
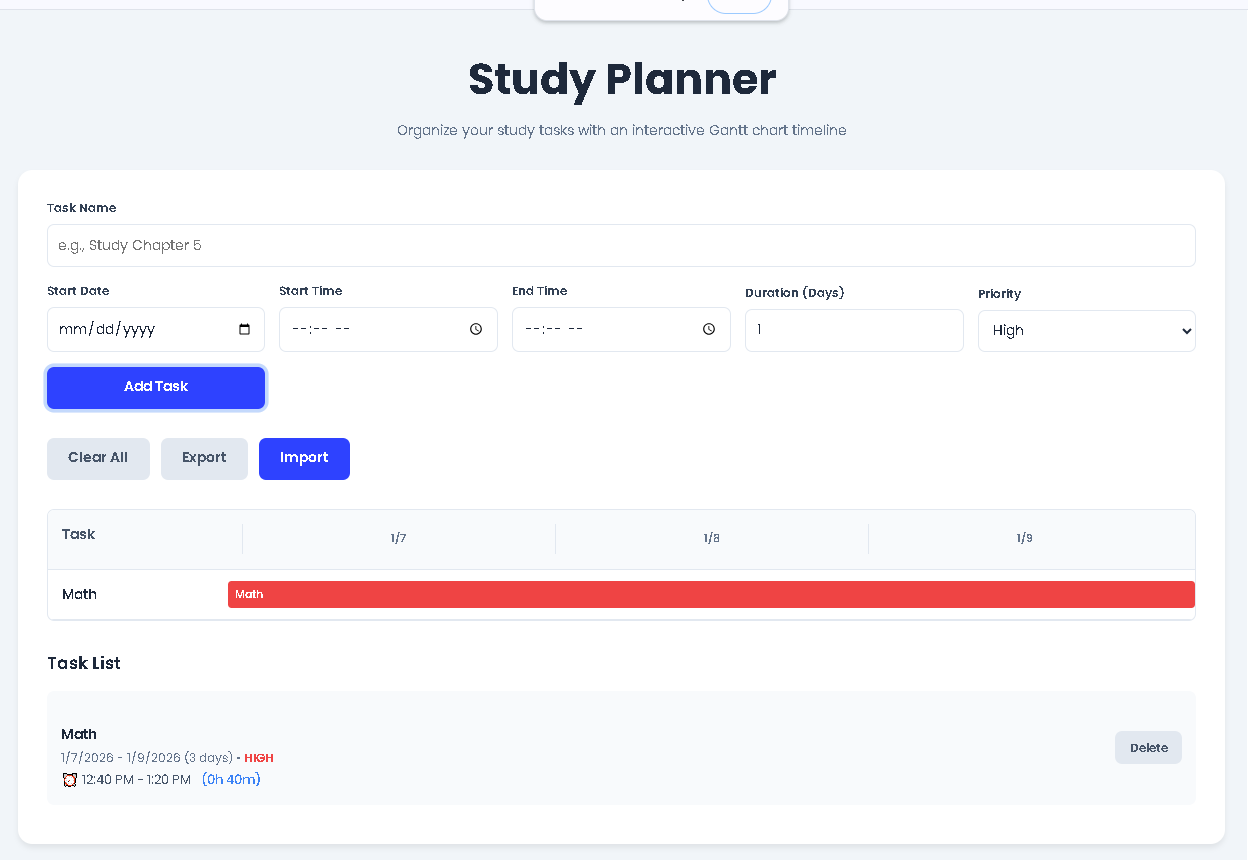
Locate the input form at the top of the tool. Here’s how to fill it out:
Task Name: Enter a specific title (e.g., “Review Chapter 5: Cellular Respiration,” not just “Biology”).
Start Date: Click the date field. A calendar picker will appear. Select the day you plan to begin this task. By default, it’s set to today’s date.
Duration (Days): Enter how many days you will dedicate to this task. For a single session, put “1”. For a multi-day topic review, enter the number of days needed.
Priority: Select High, Medium, or Low from the dropdown. This will determine the color of your task on the chart (Red=High, Amber=Medium, Green=Low).
Step 3: Add the Task
Click the blue “Add Task” button. Your task will now be processed.
Step 4: Observe the Automatic Output
Immediately after adding a task, two things happen:
The Gantt Chart Updates: Look at the main chart area. You will see a horizontal timeline with dates. Your new task appears as a colored bar spanning the number of days you specified, starting on your chosen date. The bar is labeled with your task name.
The Task List Updates: Below the chart, your task is added to a detailed list. It shows the name, the start/end date range, the duration, and its priority level.
Step 5: Build Your Complete Schedule
Repeat Steps 2-4 for every study task, exam date, project deadline, or revision block you have. Add tasks for all your subjects. As you add more, the Gantt chart timeline will expand to show the full date range of all your activities. You will visually see how tasks align, where you have busy periods, and where there is free time.
Step 6: Manage and Iterate
To Delete a Single Task: Find the task in the “Task List” section and click the “Delete” button next to it.
To Clear Everything: If you want to start over, click the “Clear All” button. A confirmation dialog will pop up.
To Save Your Schedule: Click the “Export” button. This will download a .json file of your entire plan to your computer. This file contains all your data.
To Load a Saved Schedule: Click “Import,” then select the .json file you previously exported. Your complete timeline and task list will be restored instantly.
Visual Clarity & Reduced Overwhelm: The instant Gantt chart translation of your list provides a “big picture” view that text cannot match. You immediately see the density of your workload.
Improved Time Allocation: By assigning specific durations and start dates, you move from vague intentions to concrete commitments, making your study time intentional and productive.
Priority-Based Planning: The color-coding system forces you to categorize the importance of each task. This helps ensure high-priority topics aren’t overshadowed by easier, low-priority ones.
Conflict Identification: You can easily spot if you’ve accidentally scheduled two intensive topics to start on the same day, allowing you to adjust before it becomes a real problem.
Persistence & Portability: The export/import feature means your careful plan isn’t lost. You can save it, share it with a study group, or update it on a different device.
Zero Learning Curve: The tool is designed for immediate use. There are no complex menus or features to master. You focus on planning, not learning software.
Accessibility & Cost: Being completely free and running in a web browser makes this powerful Study Planner Toolota accessible to anyone with an internet connection.
Be Specific with Task Names: “Practice Calculus Integration Problems (Ch.8)” is more actionable than “Do Math.”
Batch Similar Tasks: Instead of six 1-day “Read History” tasks, consider one 6-day “Complete Unit on World War II” task for better visual flow.
Use Priority Strategically: Reserve “High” priority for upcoming exams or difficult new concepts. Use “Low” for routine review or supplementary reading.
Schedule Buffer Time: Don’t fill every single day. Add low-duration or low-priority “Buffer” or “Catch-up” tasks after intense study blocks.
Export Weekly: Make it a habit to export your schedule every Monday. This serves as both a backup and a commitment device, solidifying your plan for the week.
Color Psychology: Leverage the automatic color coding. Let the red “High Priority” tasks visually demand your attention on the chart.
Absolutely. The Study Planner by Toolota runs locally in your web browser. Your tasks and schedule are never sent to or stored on any external server. Your data exists only on your device until you choose to export it, giving you complete privacy and control.
The current version of the tool focuses on simple, rapid planning. To “edit” a task, you would delete the existing one using the delete button in the Task List and then re-add it with the corrected details (name, date, duration, or priority). This ensures the Gantt chart updates accurately.
The Study Planner tool displays all tasks exactly as you schedule them. If two task bars overlap on the timeline, it means you have scheduled work for two different subjects or topics concurrently. The tool shows this visually so you can decide if that level of concurrent work is realistic or if you need to adjust one task’s start date.
While there isn’t a dedicated “Print” button, you can easily create a printable version. Use your browser’s print function (Ctrl+P or Cmd+P). For the best result, first export your data to ensure the timeline is fully loaded, then choose “Print to PDF” in the print dialog to save a clean, shareable document of your visual study plan.
Toolota – 350+ Free Online Tools for PDF, AI, Design & More. Use any place, any time with out paying and signup needed.